
Before
After


It is always a joy to work with clients and open up their world to new facets of design and refinement in their homes, especially when their living space has been totally morphed into new ways of making use of it by implementing my design suggestions for optimal function and energetic flow of the space.

Example before and after project showing how all requirements were met and exceeded.
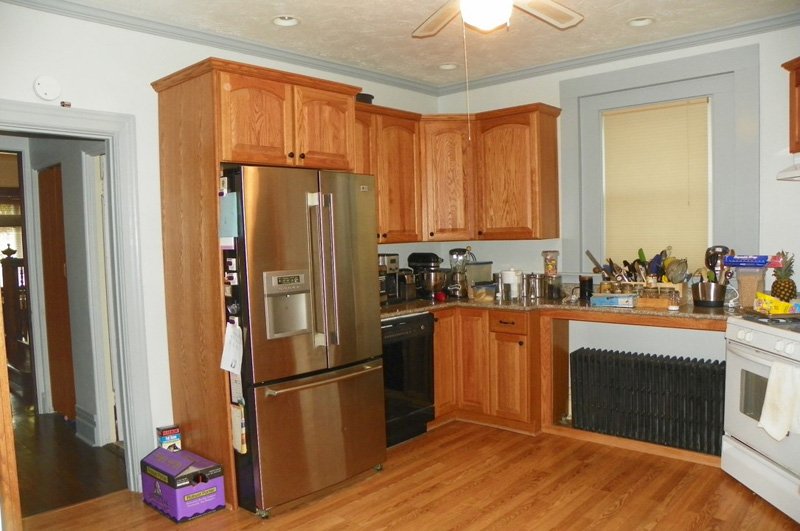

In this hundred year plus home in Shadyside, the kitchen had very limited space to work with, not to mention the wide radiator that chewed up lots of the space. My client was very fond of cooking and spent much of her time in the kitchen making elaborate meals and desserts. As you can see from her before photo, her countertops were filled with all her cooking tools and everything else because there just wasn’t a place for them. She felt like her hands were tied and was frustrated with the lack of organization and preparation surface.
In order to accommodate two ovens, that was my client’s dream, along with along with a combo convection and steam oven, I reworked the guts of a tall appliance wall cabinet to fit all the ovens. I needed more wall space to accommodate a wider four burner plus grill cooktop and needed to change the location from the stove’s previous placement. In order to accomplish that, I eliminated the radiator and replaced the heating source with a special heat producing ceiling fan. I put glass block in the window to make the area more functional and to serve as a unique backdrop for the stove lighting and ventilation. I had to maximize every inch of space that I could muster for this kitchen.


The wide casing around the window and door was using up a lot of useable wall space. The arched doorway you see off to the right was removed along with a portion of its wall to open up more area for an island and create an extended area for the kitchen.
By using narrow window and door casing, I was able to widen the useable space along the wall to accommodate a dish washer to the right of the sink instead of inconveniently across the kitchen and still have the sink centered with the window. The increased wall space also allowed a spot for a very special coffee and cappuccino maker built in on the counter that my client’s say was better than Starbucks!!! I took all the cabinets up to the ceiling to maximize storage space.


The “before” dining room next to the kitchen was very roomy. The angled wall that the fireplace was on rendered an area behind it that made a perfect spot for my client to put in a pantry. In order to carve out room in the kitchen for an island, I needed to take some space out of the dining room. My solution was to create another angled wall in the dining room to balance out the existing angled wall and contain an opening within it into the dining room.
The dining room is now balanced visually and the new shape is further defined with the ceiling application. There is also room for bar stools to be added under the extended bar height countertop opening up both rooms to set the stage for entertaining a lot of people.


The kitchen was too small to have a table in it. A small kitchen table was also contained in the dining room.
The arched doorway was removed in addition to some of the wall to open up the kitchen for an island in the kitchen extended to the dining room. Along the window an additional counter surface was added.